Localizing your Info.plist SwiftUI
In Xcode 15.2, the process of localizing strings for your Info.plist remains crucial for providing a seamless and personalized experience to users. Let's walk through the steps involved in localizing Info.plist strings within the context of requesting permissions for Ad Tracking Transparency.
Step 1: Import Necessary Frameworks
Begin by importing the required frameworks at the top of your Swift file, in this case my ContentView:
import Swift framework
These frameworks are essential for handling ad tracking permissions.
Step 2: Adding Permissions to Info.plist
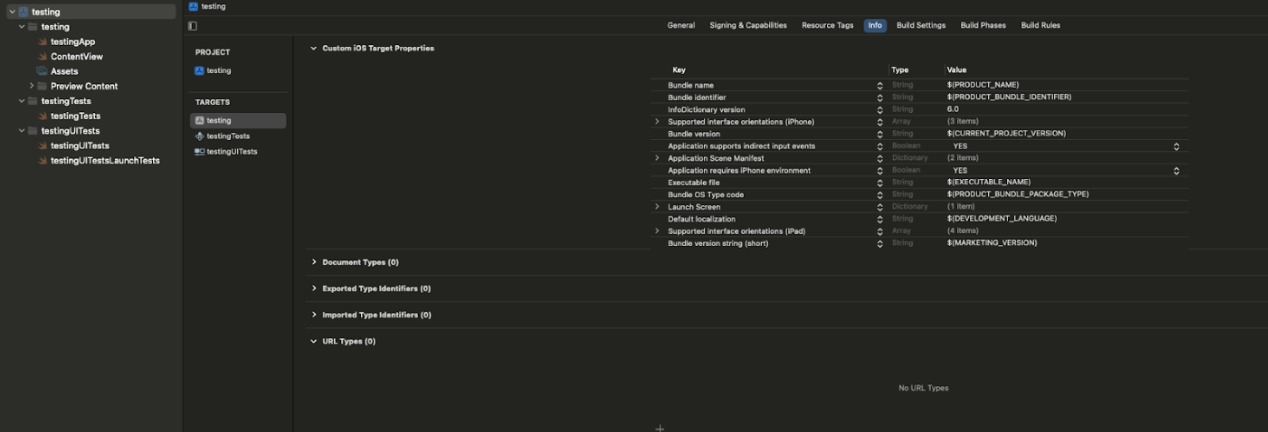
Firstly, make sure your app target is selected as shown above. Navigate to the "Info" tab. Here, you'll need to add a new URL type to create the Info.plist file. Click the '+' button under "URL Types" and ensure the Info.plist is generated for your project.
Now, observe the appearance of a new file called "Info" in your project.
Step 3: Add Privacy Tracking Key
Inside the Info.plist file, add the necessary privacy tracking key to request user permission. This key is crucial for your app to comply with Ad Tracking Transparency and it can be added by clicking the plus sign on the Plist file and searching Privacy - T.. , then it will autocomplete to “Privacy - Tracking Usage Description” once added it will look like so(see below).
The string “please allow tracking” serves as the message displayed to users when asking for ad tracking permission.
Step 4: Create a String Catalog
To facilitate localization, create a String Catalog. You have to name it "InfoPlist" . In your project navigator, right-click and choose "New File." Select "Strings catalog File" under "Resource" and name it "InfoPlist" and once done continue to the next step
Step 5: Run and build your project
once your project has been built, it will pick all the localizable keys from the PList file of your app. proceed to the next step
Step 6: Add Localized Strings
Once the string catalog is added, go to the bottom of the file and click the plus sign so you can add additional languages, in this case, I added Spanish.
inside the "InfoPlist. Strings catalog" file, provide localized versions of your message. For example:
Here, I added a simple translation.
Done- built and run your project again
Voila! Your app is now ready to cater to a global audience.
You can add more translations as needed or acording to specific language needs.
With these steps, you've successfully localized your app’s Info.plist file, ensuring a user-friendly experience for speakers of various languages.


